Multiple user roles authentication Laravel 8
Today I will create multiple roles based login in laravel app. There will be 3 types of users in my laravel app.
User types:
- Admin
- Executive
- Basic User
There are mainly 2 ways to create multiple roles authentication in laravel 8. One is with single table and the other is multiple tables. In this tutorial I will use 2 tables with 3 laravel models.
Step 1: Open project folder in git bash and enter command `php artisan make:auth`.
Step 2: Create model with migration for different types of roles. Enter command `php artisan make:model Role -m`.

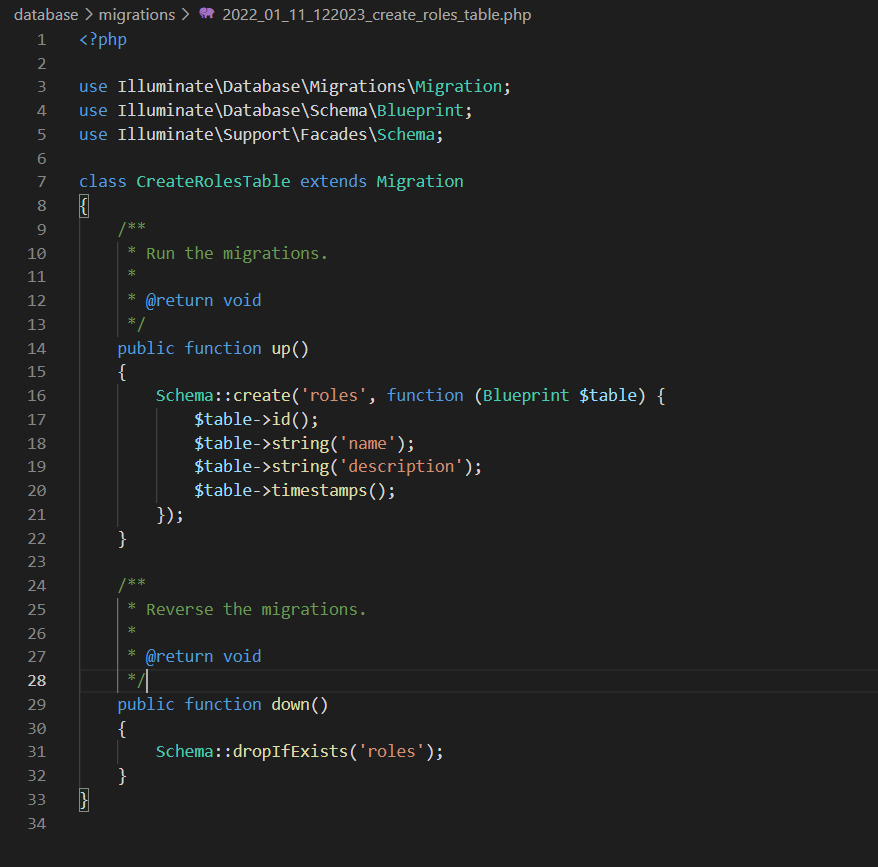
Step 3: Open file `laravel-app/database/migrations/2022_01_11_122023_create_roles_table.php` and add some columns in it.
<?php
	$table->id();
	$table->string('name');
	$table->string('description');
	$table->timestamps();
?>
Step 4: Create model with migration for user roles table. Enter command `php artisan make:model UserRole -m`.

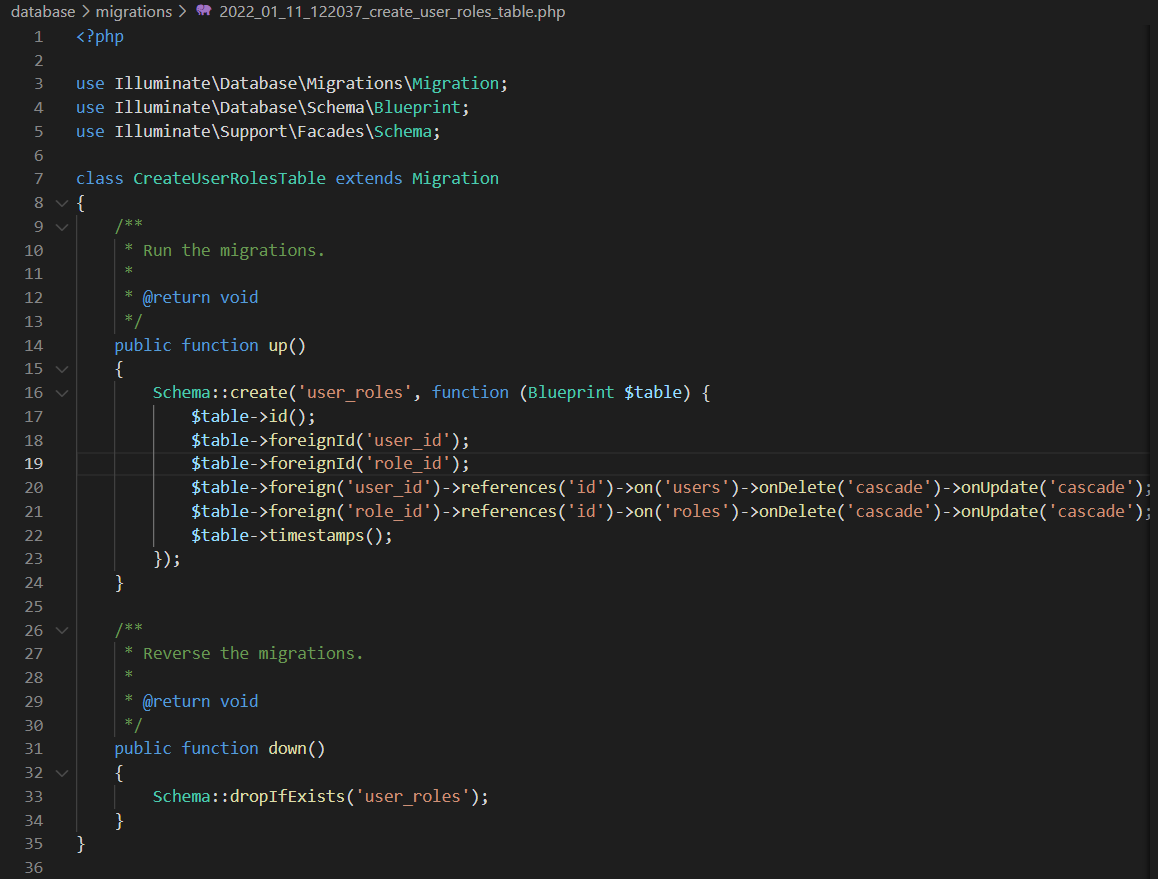
Step 5: Open file `laravel-app/database/migrations/2022_01_11_122037_create_user_roles_table.php and some columns in it.
<?php
	$table->id();
	$table->foreignId('user_id');
	$table->foreignId('role_id');
	$table->foreign('user_id')->references('id')->on('users')->onDelete('cascade')->onUpdate('cascade');
	$table->foreign('role_id')->references('id')->on('roles')->onDelete('cascade')->onUpdate('cascade');
	$table->timestamps();
?>
Step 6: Now make relationship with models
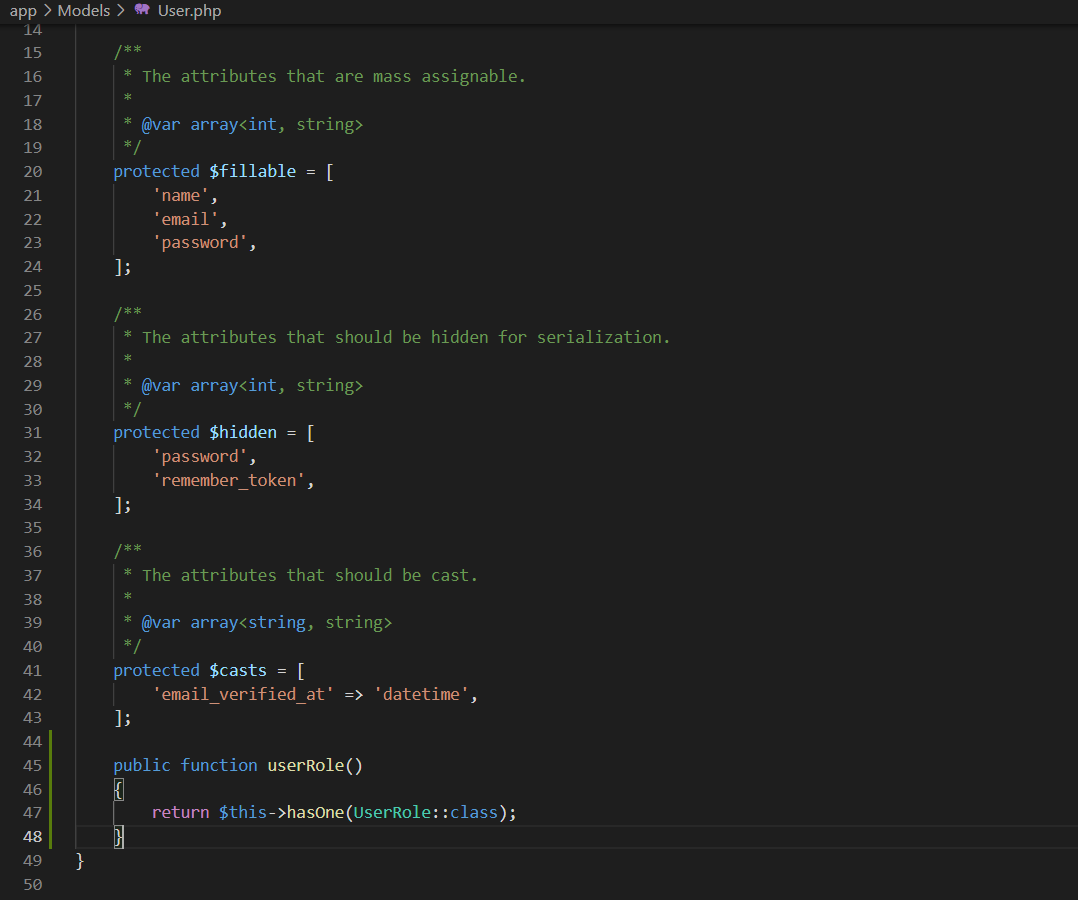
Step 7: Open file `laravel-app\Models\User.php` and add below code in it.
<?php
public function userRole()
{
	return $this->hasOne(UserRole::class);
}
?>
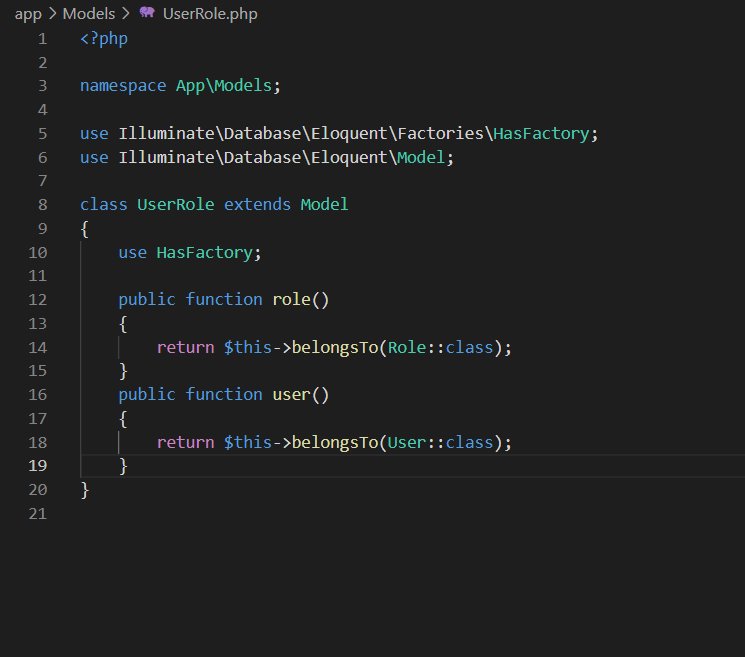
Step 8: Open file `laravel-app\Models\UserModel.php` and add below code in it.
<?php
public function role()
{
	return $this->belongsTo(Role::class);
}
public function user()
{
	return $this->belongsTo(User::class);
}
?>
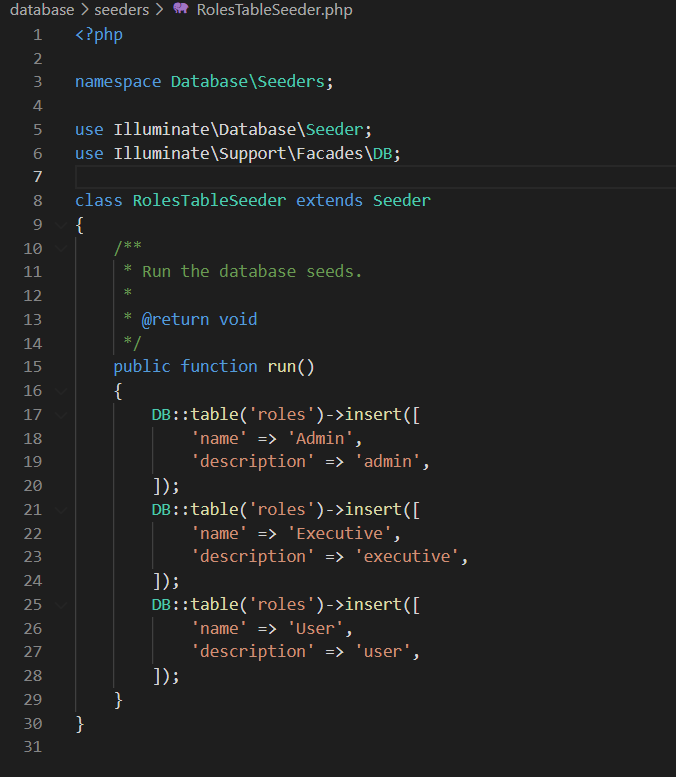
Step 9: Now we will create seeder to add roles Admin, Executive and User. Enter command `php artisan make:seed RolesTableSeeder` to create seeder.

Step 10: Open file `laravel-app\database\seeders\RolesTableSeeder.php` and add below code to add default roles.
<?php
use Illuminate\Support\Facades\DB;

DB::table('roles')->insert([
	'name' => 'Admin',
	'description' => 'admin',
]);
DB::table('roles')->insert([
	'name' => 'Executive',
	'description' => 'executive',
]);
DB::table('roles')->insert([
	'name' => 'User',
	'description' => 'user',
]);
?>
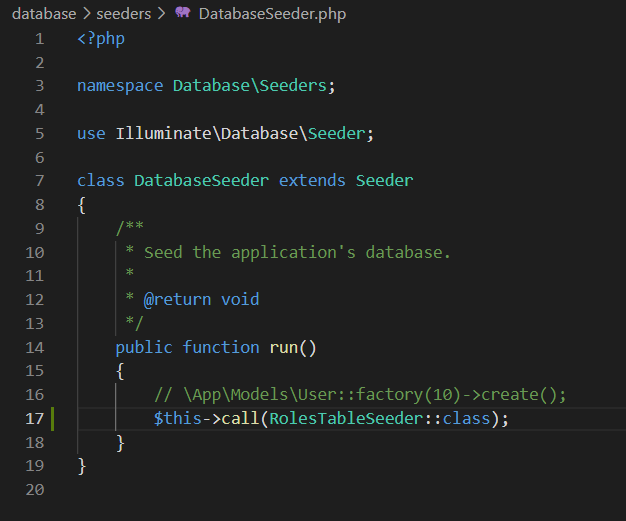
Step 11: Define RolesTableSeeder Class in `laravel-app/database/seeds/DatabaseSeeder.php`
<?php
$this->call(RolesTableSeeder::class);
?>
Step 12: Make database connection using .env file.
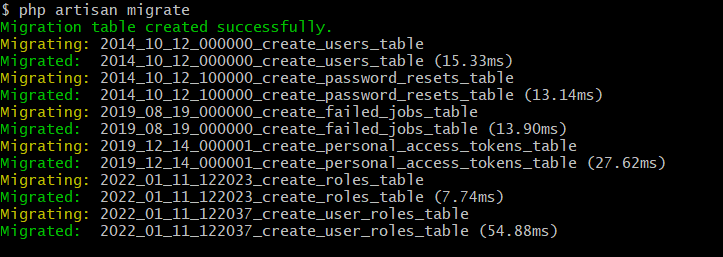
Step 13: Enter command `php artisan migrate` to create tables in database.
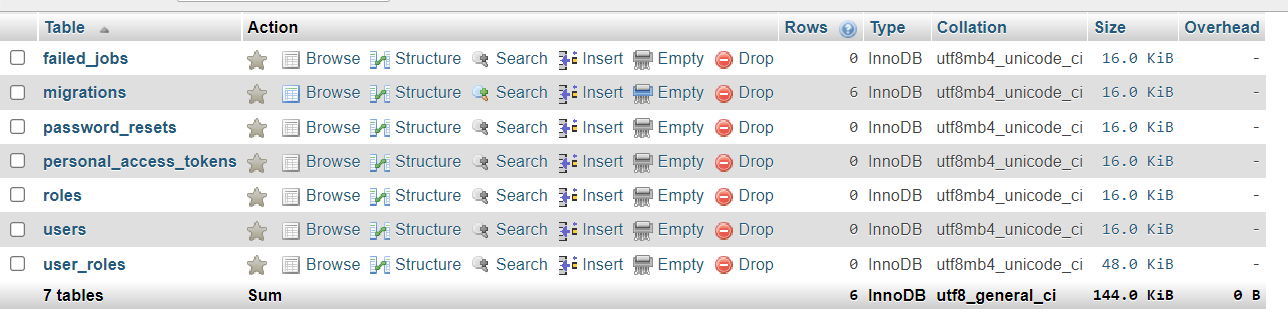
Step 14: Enter command `php artisan db:seed` to insert default roles in roles table.

Step 15: Now create controller using enter below command in your git bash laravel app.
`php artisan make:controller Backend/DashboardController`
Step 16: Enter command `php artisan make:middleware AdminMiddleware` to create middleware for admin.

Step 17: Enter command `php artisan make:middleware ExecutiveMiddleware` to create middleware for executive.

Step 18: Enter command `php artisan make:middleware UserMiddleware` to create middleware for user.

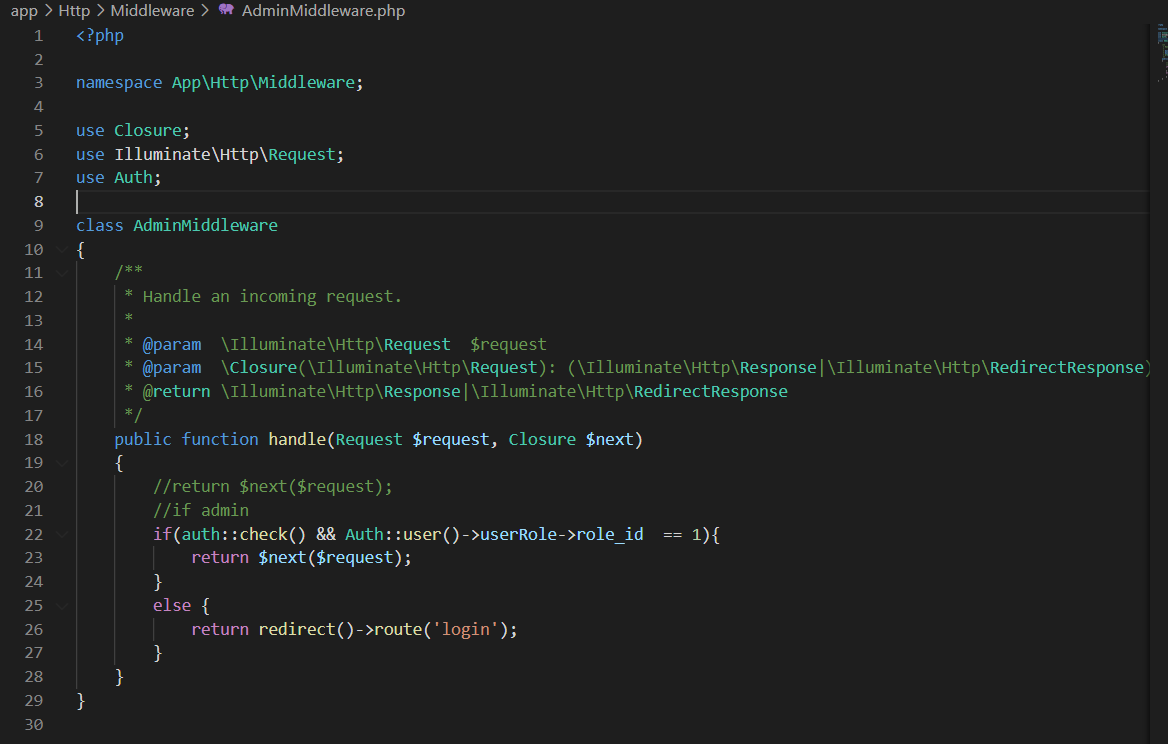
Step 19: Open file `laravel-app\app\Http\Middleware\AdminMiddleware.php` and add below code in it.
<?php
use Auth;

if(auth::check() && Auth::user()->userRole->role_id  == 1){
	return $next($request);
}
else {
	return redirect()->route('login');
}
?>
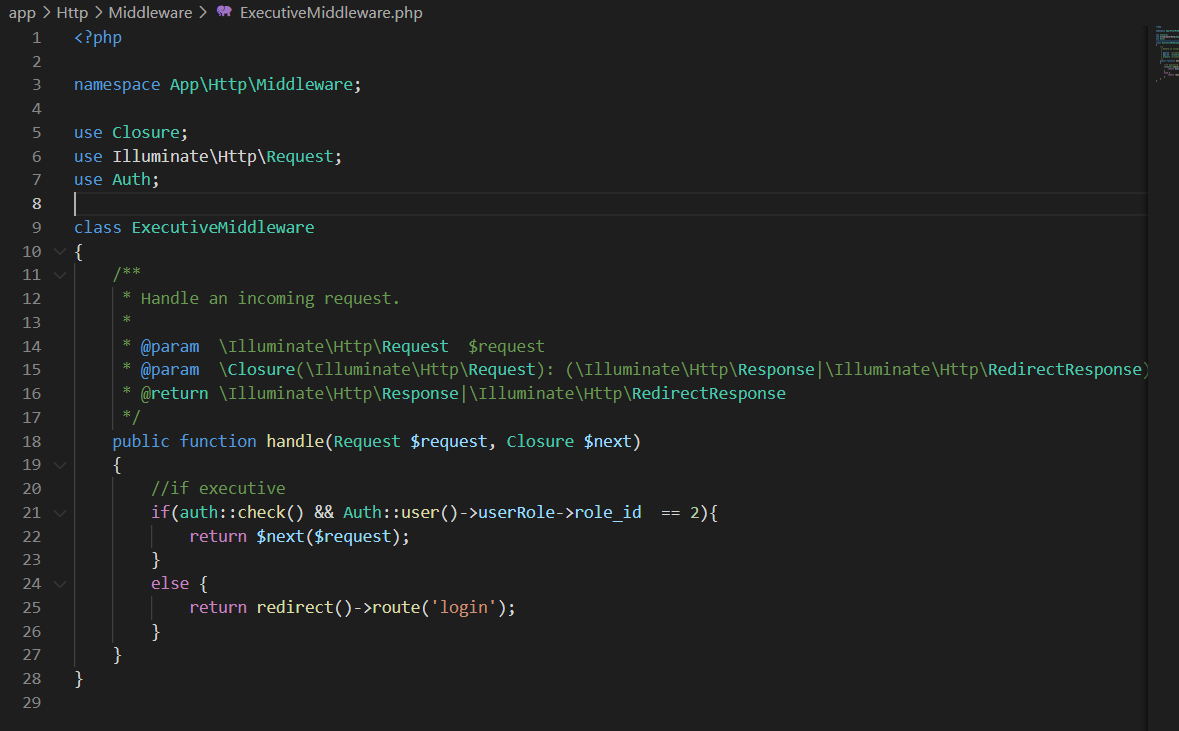
Step 20: Open file `laravel-app/app/Http/Middleware/ExecutiveMiddleware.php` and add below code in it.
<?php
use Auth;

if(auth::check() && Auth::user()->userRole->role_id  == 2){
	return $next($request);
}
else {
	return redirect()->route('login');
}
?>
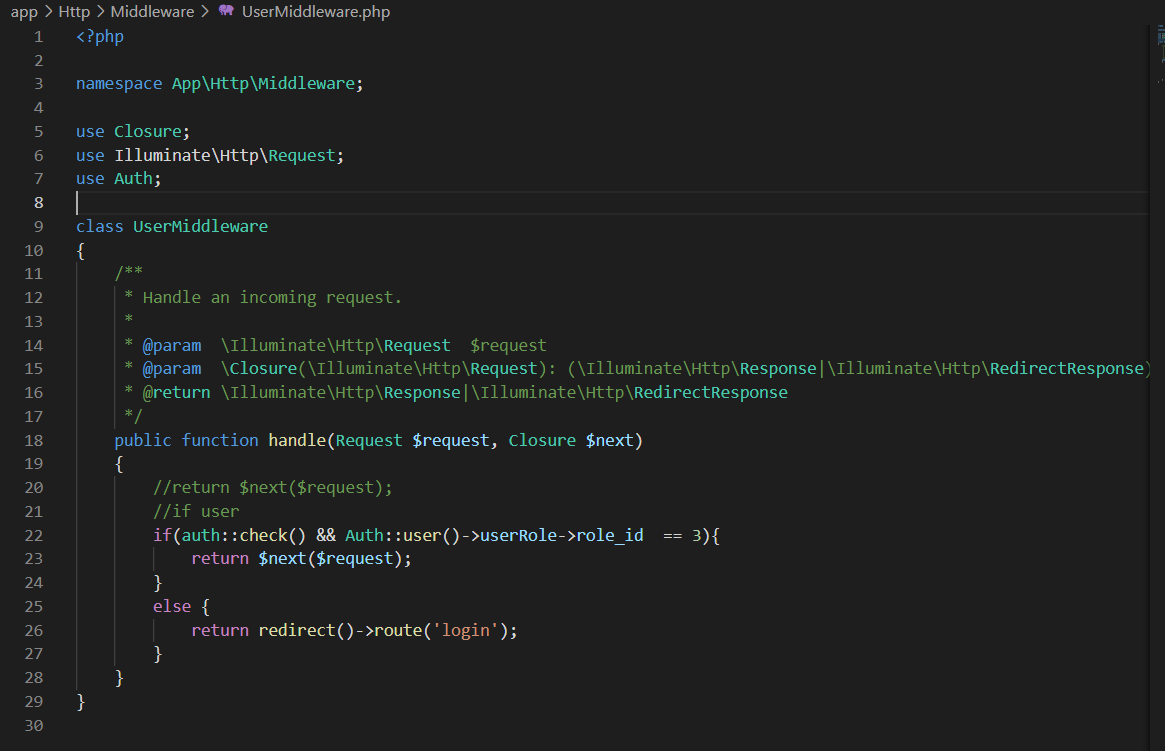
Step 21: Open file `laravel-app/app/Http/Middleware/UserMiddleware.php` and add below code in it.
<?php
use Auth;

if(auth::check() && Auth::user()->userRole->role_id  == 3){
	return $next($request);
}
else {
	return redirect()->route('login');
}
?>
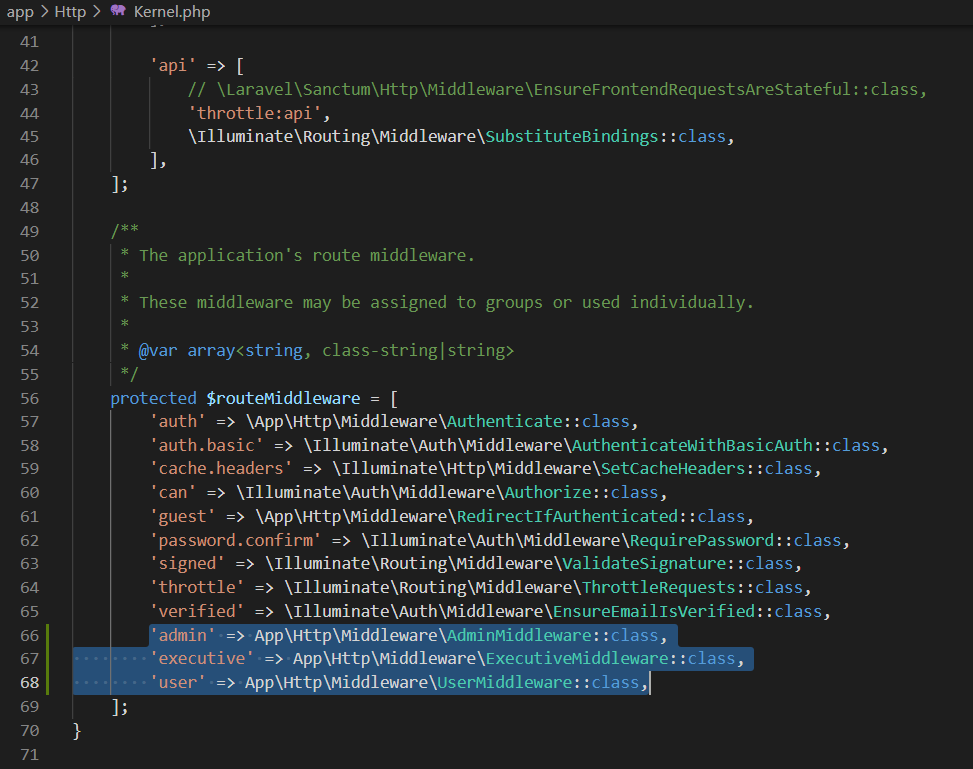
Step 22: Open file `laravel-app/app/Http/Kernel.php` and add middleware in routemiddleware array.
<?php
'admin' => App\Http\Middleware\AdminMiddleware::class,
'executive' => App\Http\Middleware\ExecutiveMiddleware::class,
'user' => App\Http\Middleware\UserMiddleware::class,
?>
Step 23: Open `laravel-app/http/Controllers/Backend/DashboardController.php` and add below functions in it.
<?php
public function admin(){
	echo 'welcome to admin';
	//add admin view files
}
public function executive(){
	echo 'welcome to executive';
	//add executive view files
}
public function user(){
	echo 'welcome to user';
	//add user view files
}
?>

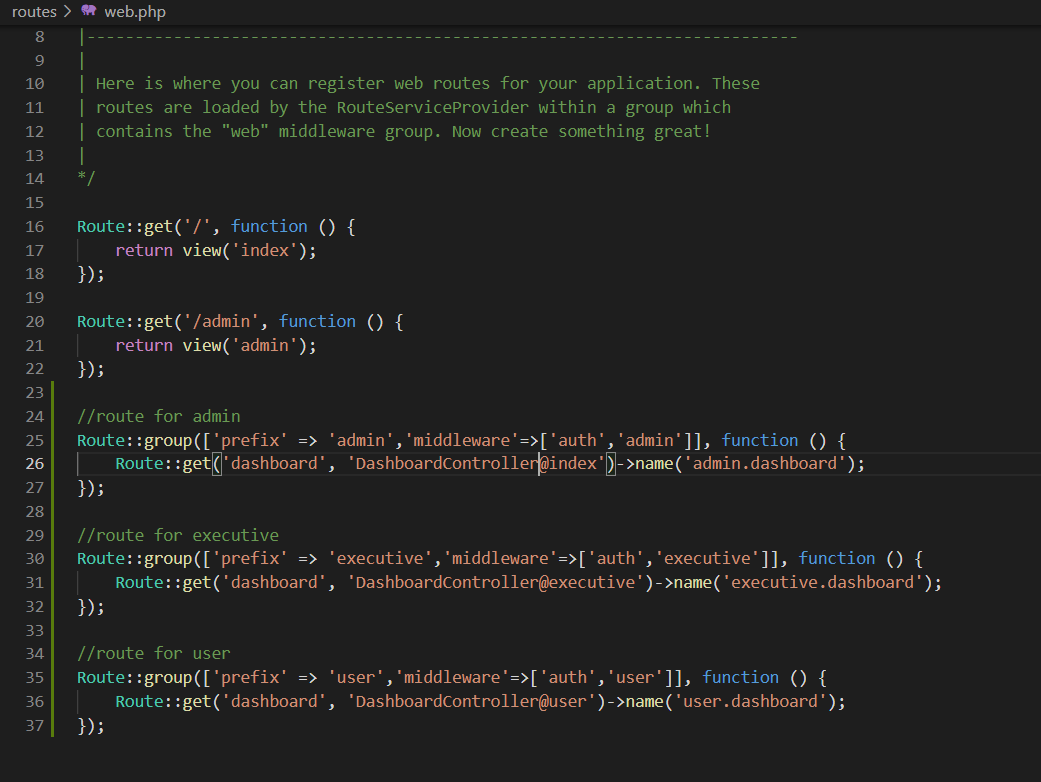
Step 24: Now create routes in `laravel-app/routes/web.php` using middleware.
<?php
//route for admin
Route::group(['prefix' => 'admin','middleware'=>['auth','admin']], function () {
		Route::get('dashboard', 'DashboardController@index')->name('admin.dashboard');
});

//route for executive
Route::group(['prefix' => 'executive','middleware'=>['auth','executive']], function () {
		Route::get('dashboard', 'DashboardController@executive')->name('executive.dashboard');
});

//route for user
Route::group(['prefix' => 'user','middleware'=>['auth','user']], function () {
		Route::get('dashboard', 'DashboardController@user')->name('user.dashboard');
});
?>
Recommanded Articles
- How to create a multilevel category and subcategory in Laravel
- How to check YouTube video exist Laravel validation
- Multiple user roles authentication Laravel 8
- Deploy Laravel project from local to production server
- Make custom pagination URL in Laravel without query strings
- Web Scraping in Laravel using Goutte
- Insert values during migration run laravel
- Validation for string characters only with custom message in Laravel
- Add new columns in a table Laravel
- How to create foreign key constraints in Laravel

Latest Comments
Raghi
05 Oct 2022